
B Vents are double walled, factory-built vent pipes that are used to vent gas. The outside of B vent is always galvanized, and the interior is always aluminum.
Now come to the point, to install a vent requires several steps. If you want to know how to install a B vent through the roof, read the article attentively.
Before you install a B vent in your roof, make sure you check the national construction codes in your region. Then map out your path, find the roof opening, dig a hole, install the support bracket that will hold the B vent, and finally connect the pipe with your appliances.
Still feel to know more detail? Well, let’s get into the core of the matter: the details guidelines for placing a B vent through the roof.
How To Install B Vent Through Roof?
B vent is a relatively cheap that may be used as a connector or vent. You know how tough it is to install the B vent through the roof.
Don’t worry, the step by step instructions on how to install a b vent through a roof may make it just a simple task for the house owner. Follow the steps outlined below:
Step 1: Check the instructions
You must carefully read the instructions that come with your b vent. All of the directions are provided there. For the installation, you must follow these guidelines.
Step 2: Determine the B Vent Path
Make a precise strategy for the entire procedure before installing anything. You may make a list of all the dimensions and materials you’ll need to do this project.
Make a path plan for the b vent from the appliance to the roof.
Step 3: Check the licenses
The B vent transfers hot gases from outside your home efficiently. It can sometimes result in a fire hazard. As a result, before installing it, make sure you get permission from the local building authority of your area.
Step 4: Determine the location of the roof opening
You have to determine the exact place where you wish to create the roof opening when everything has been planned and all the clearances have been checked. Then dig a hole in that place.
Step 5: Check the diameter of the hole
Go to the top of the roof and check the hole you cut in the roof from above. Confirm that the hole is drilled accurately, in the proper position, and with the correct diameter.
Step 6: Mark the hole position to insert the B vent
Mark the position and margins of the hole necessary for the B vent to leave the roof while the roofing away from the worksite.
Step 7: Place the Supporting Bracket in the right place
To set the B vent through the roof, you need supporting brackets. The supporting bracket keeps the b vent in right place in the hole through the roof.
Pass the support bracket through the hole that has been marked.
Step 8: Build the connection of the B Vent
Your B vent installation is nearly complete. Now is the time to return to the basement and connect all of the b vents with your appliance towards the roof hole.
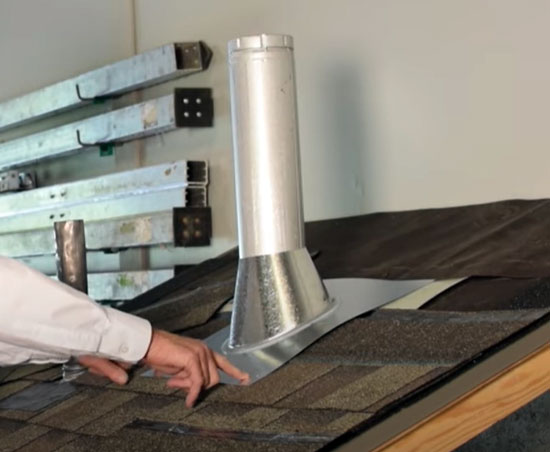
Step 9: Apply the flashing
After connecting the B vent with your appliance, add the flashing. The roof flashing which slides down across the vent piping system should be included in the B vent piping kit.
Incorporate the flashing onto the B vent pipe.
Step 10: Check the height of the vent
The termination height of the B vent above the rooftop and closest ridge should be governed by local regulations or construction codes.
When the height is nearly eight feet, a vent pipe with a diameter of 3 to 12 inches needs to end at minimum two feet taller than a wall or barrier. And when it is nearly ten feet, a vent pipe with a diameter of 14 inches or greater needs to end at minimum two feet taller than a wall or barrier.
Your B vent installation is finished. Now check all the steps you did appropriately as we said.
Verdict
I hope you’ve found this article useful. Now you have learned how to install a B vent through the roof.
B vent installation may make your home more comfortable to live in. Hot gases are removed from your house through these vent pipes, which can cause harm to your health. As a result, B vent construction is a fantastic method to conserve money while still keeping your house free from exhaust gases.
So install your B vent through the roof of your house. And to do so, follow the steps outlined above and have a fantastic time.
While working, please be careful. Best regards.


